What can you do with the new Calendar?
With Google Calendar, you can quickly schedule meetings and events and get reminders about upcoming activities, so you always know what’s next. Calendar is designed for teams, so it’s easy to share your schedule with others and create multiple calendars that you and your team can use together.
What you need:
account_circle G Suite account
schedule 10 minutes
Switching from a different calendar program? You may also want to see Switching to Google Calendar from Outlook or Switching to Google Calendar from IBM Notes.
Schedule events
In Calendar, it’s easy to schedule one-time activities, such as conferences, as well as recurring events, such as staff meetings. When you receive an invitation to an event, you can let everyone know if you’re attending with a single click.
In this section, you learn how to:
Create an event
- In calendar.google.com, click an empty time slot in the calendar grid and click Event. You can also click Create .
- (Optional) To create an event using another calendar, next to your name, click the Down arrow arrow_drop_down and select a calendar.
- Add an event title, date, and time, and click More options or .

Invite guests
- Open your event.
- In the Guests tab, go to Add
guests and enter the first few letters of a person’s name or
email address in the box.
Matching names and addresses in your organization’s directory appear as you enter text.
Tip: You can also add a Google Groups mailing list address to invite a large group of people at once. For more information about inviting a large group, see managing large events in Calendar. - Click a suggestion to add that person to the event. If no suggestions appear, enter your guest’s full email address.
- (Optional) To mark a guest’s attendance as optional, hover over the guest name and click Mark optional person.
- (Optional) To allow guests to modify the event, invite others, or see the guest list, under Guests can, check the appropriate boxes.

Reserve a room and resources
- Open an event.
- Click the Rooms tab.
- In the search box, enter a room or building name, floor, or resource name (such as a phone or Chromebox for meetings). As you enter text, results appear below the search box.
- (Optional) Hover over a room to see details, such as:
- group Room capacity
- business Location
- videocam Audio or video equipment
- info_outlineOther features available in the meeting room, such as wheelchair access or a whiteboard
- sort Additional information
- Click the result you want to add it to the event.

Add event details, video conferencing, and attachments
- Choose a time zone.
- Set up a recurring event.
- Find a time—Find a time when your coworkers are free for the meeting.
- Add event details—Add the meeting location, send event notifications, and more.
- Add video conferencing—Add a video meeting to your event.
- Add an event description—Add details, such as contact information, instructions, or links for your event. Format your description by adding bold, italic, or underline, or add lists and links.
- Add attachments—Attach files, such as documents or presentations to your events.

Save or update an event and notify guests
When you’re finished filling in the details, save your event and send invitations.
- Click .
- Click Send to notify guests by email or Don’t Send if you don’t want to notify guests at this time.
- If you’re inviting people outside of your organization, click Invite External Guests to notify them or Continue Editing to notify them later.
You can update an event time, invite more guests, add a note, and more.
- In the Calendar grid, click the event and then click Edit create.
- Make your change, such as updating an event time, or attaching a file.
- Click .
![]](/upload/gsuite/photos/2018_06/1529468288_0WXX3Jq.png)
Respond to events
When you get an invitation to an event, it appears on your calendar.
Reply to an invitation:- In the Calendar grid, click the event and at the bottom, select your response.
- (Optional) To change your response at any time, click the event and choose a new response. You can also add a note to your RSVP.
Note: You get invitations by email as well. If you're using Gmail, you can respond to the invitation by clicking RSVP in the email invite, or select a response option in the email.

Check who accepted and declined your invite
- In Calendar, open your event and in the guests field, see responses from your guests.
- If you invite a group to an event, click the Down arrow arrow_drop_down to see responses from your guests.

Delete and restore events
- Click the event in your calendar grid and click Delete delete.
- To find your deleted event, click Settings settings > Trash.
- Hover over the event and choose an option:
- To restore the event, check the box next to the event and click Restore undo.
- To permanently delete the event, check the box next to the event and click Delete delete.
- (Optional) To delete all events in your trash, at the top right, click Empty trash.
Note: Deleted events remain in a calendar's trash for approximately 30 days.

Create reminders
To remember something on your to-do list, add a personal reminder.
In this section, you learn how to:
Create a personal reminder
If you don’t see Reminders, under My
calendars next to Tasks, click
More more_vert >
Switch to Reminders.
- In your Calendar grid, click a time slot and click Reminder.
- Add a title and choose a date and time.
- (Optional) To select the frequency of your reminder, click Does not repeat and select an option.
- (Optional) If you want your reminder to last all day, check the All day box.
- Click .
Note: Reminders you create in Google Keep also show up in Calendar.

Change a personal reminder
- Choose an option:
- If you have a single reminder in a time slot, click the reminder and then click Edit mode_edit.
- If you have multiple reminders in the same time slot, click the reminder block, hover over the reminder, and click Edit mode_edit.
- Update the details and click .

Complete or remove a personal reminder
You can remove a reminder from your calendar by marking it as done, deleting it, or hiding all reminders temporarily.
Mark a reminder done:- If you have a single reminder in a time slot, click the reminder and then click Mark as done.
- If you have multiple reminders in the same time slot, click the reminder block, hover over the reminder, and click Mark as done check.
- If you have a single reminder in a time slot, click the reminder and then click Delete delete.
- If you have multiple reminders in the same time slot, click the reminder block, hover over the reminder and click Delete delete.
On the left under My calendars, uncheck the Reminders box.

Share and view calendars
Share your calendar with coworkers, family, and friends so they can easily see when you’re available. You can look at other people’s calendars to do the same.
In this section, you learn how to:
Share your calendar
 Choose
whether to share your calendar publicly or only with your
organization:
Choose
whether to share your calendar publicly or only with your
organization:
- Click Settings settings > Settings.
- On the left, select your calendar and then click Access permissions.
- Select how you want to share your calendar:
- If you want your calendar to be available publicly on the web, check the Make available to public box.
- If you want your calendar to only be available to your organization, check the Make available for My Organization box.
- Next to each sharing permission, click the Down arrow arrow_drop_down and choose whether you want to show your free and busy times.
Let
someone see your calendar in a web browser:
You can get a HTML link to your calendar that you can share with people.
- Click Settings settings > Settings.
- On the left, select your calendar and then click Access permissions.
- To send a shareable HTML link to people, click Get shareable link > Copy Link.
- Paste and send the link.
Share
your calendar with specific people and choose how much they can
see:
When you share your calendar with someone, you can decide how they see your events and whether they can also make changes, such as adding or editing events.
- Click Settings settings > Settings.
- On the left, select your calendar and then click Share with specific people.
- Click Add People and enter the email address or names of the people you want to share your calendar with.
- Choose a sharing permission option:
- See only free/busy (hide details)
- See all event details
- Make changes to events
- Make changes and manage sharing
Share
your calendar with people who don’t use Google Calendar:
- In the Share with specific people section, click Add People.
- Enter the email address or names of the people you want to share your calendar with.
- Click Send.
- If the person you’re sharing your calendar with doesn’t use Calendar, click Invite to send them an invitation to use it.

View other people's calendars
Wondering if someone is available to meet? Add a team member’s calendar so you can instantly check their schedule.
-
Add a team member's calendar:
- On the left, click Add a coworker’s calendar and start entering the person’s name or email address.
- Select the person from the list.
- If the person set up their calendar for sharing, it appears in your list of calendars. That person's events also appear on your calendar.
- If the person doesn’t have Google Calendar, add a request and click Send Invite.
- Quickly schedule events by checking your coworkers’ availability:
- To view a coworker’s calendar next to yours, check the box next to their name.
- To view several coworkers calendars at once, check the boxes next to their names. At top right in the view switcher box, click Day. The calendars appear next to each other so you can easily see when everyone is free at the same time.
- (Optional) To view only your calendar, hover over your calendar name and click More more_vert > Display this only.

Create a shared calendar
In addition to your own calendar, you can create shared calendars to track group activities, such as project schedules, or coworker vacations.
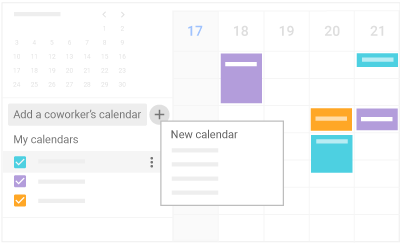
Create a team calendar:- On the left next to Add a coworker's calendar, click Add add > New calendar.
- Name the calendar and add a description.
- Click Time zone and select your time zone.
- Click Create Calendar. Your new calendar appears under My calendars.
- (Optional) To update any calendar preferences, hover over it and click More more_vert > Settings.
Note: You can create as many calendars as you want using the same process.
Import and export events and calendars
You can import event information to your calendar or export your calendars. Learn more about importing events to Calendar.
Import event information:- On the left next to Add a coworker's calendar, click Add add > Import.
- Click Select file from your computer, select your file, and click Open.
- Click Import. The imported event or events will appear in your calendar.
- Click Settings settings > Settings.
- On the left, click Import & Export.
- In the Export section, click Export.
A ZIP file is downloaded to your computer. If you open the ZIP file, you'll see individual ICS files for each of your calendars. To import the files back into Calendar, take the individual ICS files out of the ZIP file and import them one at a time.

Delete a calendar
- Click Settings settings > Settings.
- Select the calendar you want to delete and scroll to the bottom.
- In the Remove calendar section, choose an option:
- Click Unsubscribe if you want to unsubscribe from calendars that are read-only.
- Click Delete if you want to delete calendars that you own.

Customize your calendar
Now that you know how to use all the key features in Calendar, you can customize it further to match the way you work.
In this section, you learn how to:
Manage event notifications
You can decide how you want to manage your incoming event notifications.
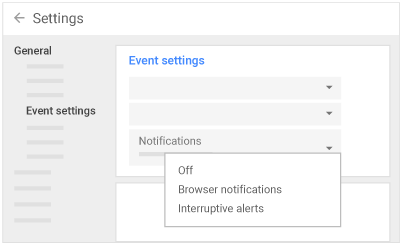
Manage event notifications:- Click Settings settings > Settings.
- On the left under General, click Event settings.
- Click Notifications and select one of the
following options:
- Off
- Browser notifications
- Interruptive alerts
- To set up a sound for your incoming notifications, check the Play sound box.
- On the left, select your calendar and then click General notifications to manage what type of event notifications you receive.
- Alongside each option, click the Down arrow arrow_drop_down next to Email to select whether you want notifications on or off.
- Click your event and then click Edit mode_edit.
- Next to Notifications notifications, select Email or Notification.
- Select a time period for notifications.
- (Optional) If you want to add another notification, click Add Notification and repeat steps 2–3.
Choose your calendar view
You can choose how many days you see at a time in your calendar view. Select the option that’s best for you at the top of your calendar.
Choose your calendar view:At the top right in the view switcher box, click the Down arrow arrow_drop_down and choose an option:
- View a calendar by day, week, month, or year
- View your schedule
- Hide or show weekends
- Hide or show declined events
- View multiple calendars side-by-side in day view—Select Day view and check the boxes next to the calendars you want to see.
To view the next or previous day’s calendar—Next to Today, click Next keyboard_arrow_right or Previous keyboard_arrow_left.
Manage your calendar view settings:
- Click Settings settings > Settings.
- On the left under General, click View options.
- Depending on the view you want, check or uncheck the following
boxes:
- Show weekends
- Show declined events
- Reduce the brightness of past events
- View calendars side by side in Day View
- Click Start week on and choose when to start the week.
- Go to the Set custom view field and click the Down arrow arrow_drop_down to choose the number of days or weeks you want to appear in your calendar view.
- Go to the Alternate calendars field and click the Down arrow arrow_drop_down to choose an alternate calendar.

Change your calendar's look
Changing the way your calendar appears can help you when you have several calendars layered on the same screen.
Change your calendar’s density and color set:
- Click Settings settings > Density and color.
- Click Information density > Compact or Responsive to your screen.
- Click Color set > Modern or Classic.
- Click .
On the left, hover over your calendar and click More more_vert > select the color you want from the palette.
Change an event’s color: Right-click an event and select a new color.
Note: If you change the color of an event, the original color is represented as a vertical line on the left side of the event.
