What can you do with quizzes in Forms?
You can quickly assess your students' understanding with automatic and manual grading tools. Specify correct answers, points, and give feedback for correct and incorrect responses. Identify frequently missed questions that need further review in the response summary.
What you need:
account_circle G Suite account
schedule 10 minutes
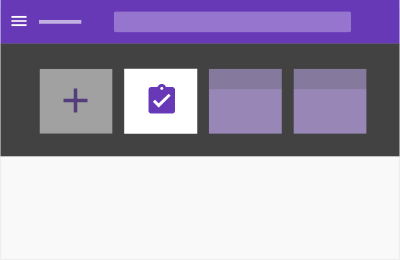
Create a quiz
Start by creating a quiz from scratch or changing an existing form into a quiz.
In this section, you learn how to:
Create a new quiz or convert a form
 Create a
new quiz:
Create a
new quiz:
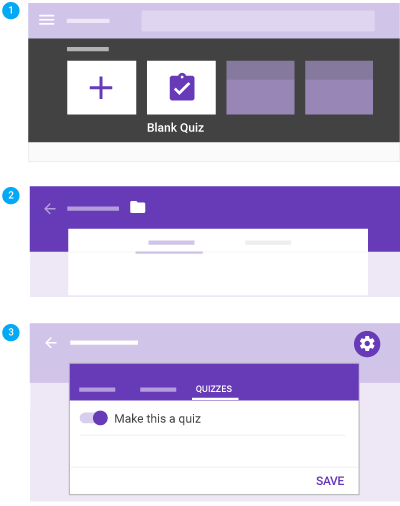
To create a quiz from Forms, go to forms.google.com and click Blank Quiz.
To create a quiz from Drive:
- Click New, hover over More > Google Forms arrow_forward_ios and click From a template.
- On the General tab, scroll to the bottom and click Blank Quiz.
Customize your quiz:
- Name your file: In the top left, click Blank Quiz and enter a name.
- Name your quiz: Above the questions, click Blank Quiz and enter a name.
- (Optional) Take any of the following actions:
- Move your form to a different Drive folder: Click Move to folder folder. Choose your folder and click Move here.
- Add a description: Under the quiz name, add your text.
- Change the background color or theme: Click Color Palette palette, then select a color. Or, click Add image image and select a theme.
Convert
a form into a quiz:
- Open the form in Forms.
- Select Settings settings > Quizzes > Make this a quiz > Save.
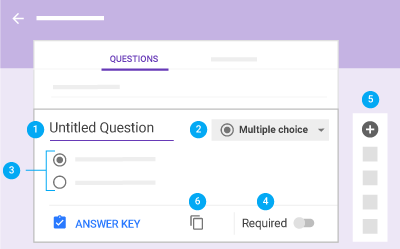
Add questions
Click
Untitled question and enter your question. You get
suggestions based on your type of question.
(Optional) To
change the question type, click the Down arrow arrow_drop_down.
Add response
options (if applicable for your question type).
(Optional) To
specify if people must answer the question, click
Required.
To add more questions, choose an option:
To add a new
question, click Add question add_circle.
To add a copy of
the existing question, click Duplicate content_copy.
Note: Changes are automatically saved. To preview your changes any time, at top right, click Preview visibility.
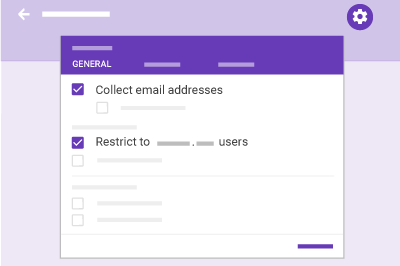
Collect email addresses and names
To identify each respondent and send quiz results or feedback, you can collect email addresses and request individual names.
To turn on email collection, click Settings settings > Collect email address. There are 2 approaches when you’re collecting email addresses:
- Domain restricted: Automatically collects the person’s organizational email address (that they are signed in with). Select the setting Restrict to 'your organization’s' users.
- Unrestricted: People can enter any email address. Deselect the setting Restrict to 'your organization’s' users.
To collect names, create a question that asks people to enter their names. You can also create a separate section for collecting emails and names. See Track students in different periods who take the same quiz.
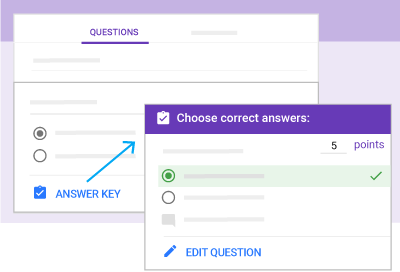
Specify correct answers and points
You can specify answers for these question types: multiple choice, checkbox, dropdown, and short answer. You can also specify how many points a correct answer is worth.
Specify correct answers and points:
- Click the question.
- Click Answer Key.
- Select or type the correct answer (or answers).
- Next to the question, enter the number of points the correct answer is worth.
- Click Edit question to go back to the question. Changes save automatically.
Type of question:
Marked correct if respondent provides:
Type of question:
Multiple choice
Marked correct if respondent provides:
Any matching answer
Type of question:
Dropdown
Marked correct if respondent provides:
Any matching answer
Type of question:
Checkbox
Marked correct if respondent provides:
All matching answers (if there are several)
Type of question:
Short answer
Marked correct if respondent provides:
The exact answer
Note: You can automatically mark non-matching responses as incorrect by selecting the option Mark all other answers incorrect. If you don’t select this option, non-matching responses are left ungraded for you to manually review and award points.
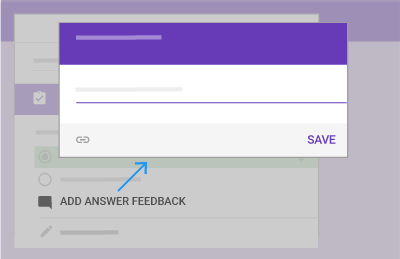
Add feedback to answers
You can add feedback for incorrect and correct answers to each question. Respondents won’t see the feedback until they get their results.
Add feedback to answers:
- Click the question.
- Click Answer Key > Add Answer Feedback.
- Depending on the type of question, choose from the following
actions:
- For questions graded automatically, add feedback under Incorrect Answers, Correct Answers, or both.
- For questions graded manually, enter general feedback. It appears for all responses.
- (Optional) To add a link:
- Click Link insert_link.
- In Link to, add the URL.
- (Optional) In Text to display, enter the text you want to appear.
- Click Save.
Send a quiz
Once your quiz is ready, you can send it to your respondents.
In this section, you learn how to:
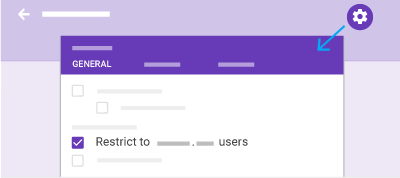
Control who can respond
You can limit respondents to people in your organization. That way, only people who have an email that’s associated with your organization can respond to the quiz. If you don’t limit respondents, then people can respond to the quiz using any email address.
To limit respondents to people in your organization, click Settings settings > Restrict to your organization’s users.
Send a quiz
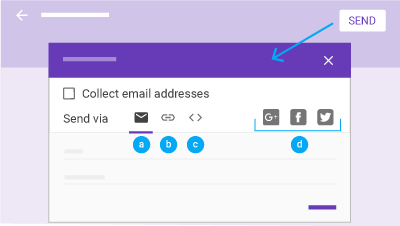
When you’re ready to send out your quiz, you can send it by email, copy and paste a link in a chat or email message, embed it on a website, or share a link on social media.
Send your quiz:
- At the top right, click Send.
- (Optional) To collect email addresses, choose an option:
- If the quiz's audience is limited to your organization, check Automatically collect respondent’s your organization email address.
- If you’re distributing the quiz externally, check Collect email addresses.
- Choose how you want to send the quiz:
Email—Click Email email. Enter email addresses in the
To field. You can customize the subject and
message contents.
Link—Click Link insert_link. You can shorten the URL.
Click Copy and paste the link into a chat,
conversation, or email.
Website content—Click Embed code. You can specify inline frame
dimensions. Click Copy and paste the HTML into
your website or blog.
Social media—Click one of the social media icons.
Grade a quiz
You can grade quizzes by question or by individual. For example, you might prefer to grade all answers to a specific question at once. Or perhaps you want to grade an individual’s entire quiz.
In this section, you learn how to:
Grade by response
Some questions need to be graded manually, like short answer or paragraph formats. To grade faster and reduce potential bias, you can grade by question. This is because identifying information doesn’t appear by default. You’ll see all the answers for a particular question at once.
Note: You can’t grade by question for grid-type questions.
Grade by response:
- Under Responses, click Question.
- Mark each response as Correct check,
Incorrect clear, or
assign partial or extra credit points by entering them in the rightmost
field.
Note: The same responses are grouped together. This way, you can give feedback or assign scores in bulk.
- When you’re done grading all responses for a question, click Save.
- To move between questions, click Previous arrow_back_ios or Next arrow_forward_ios.

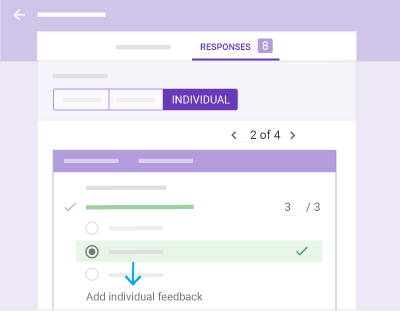
Grade by respondent
You can grade an individual’s entire set of quiz responses at once.
Grade by respondent:
- Under Responses, click Individual.
- For each question (except grid-type questions, which aren’t
graded), take any of the following actions:
- In the rightmost field, enter how many points the response
earned.
Questions that have been graded automatically are assigned the maximum number of points for a correct answer, and zero points for an incorrect answer. If you want to override these values, you can. - (Optional) Click Add individual feedback.
Enter your feedback and click Save.
If you already specified feedback, it will be overridden.
- In the rightmost field, enter how many points the response
earned.
- To save all changes, click Save.
- To move between individuals, click Previous arrow_back_ios or Next arrow_forward_ios.
Send quiz results
You can send quiz results immediately upon submission, or send results by email later.
In this section, you learn how to:
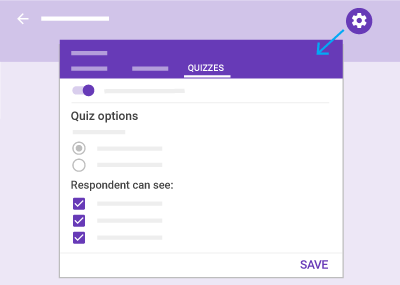
Customize quiz results
When you send quiz results, whether automatically or manually, the following information is included:
- Incorrect responses
- Correct answers
- Point values
Customize quiz results:
- In Forms, open a quiz.
- Click Settings settings > Quizzes.
- Under Respondent can see, select or deselect any of the options.
- Click Save.
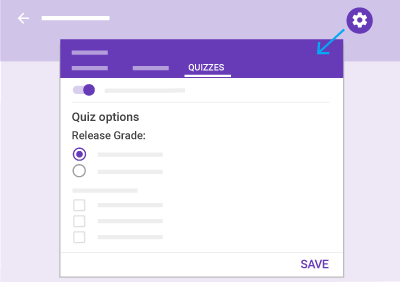
Choose when to send results
- At the top right, click Settings settings.
- Click Quizzes.
- Choose an option:
- Immediately after each submission: Automatically sends respondents their results after submission.
- Later, after manual review: Email results to respondents at a time of your choosing. Selecting this option turns on email collection, which is necessary so that you can send results later.
- Click Save.
Send results by email
When you’re finished grading and ready to send results, you can choose who to send them to.
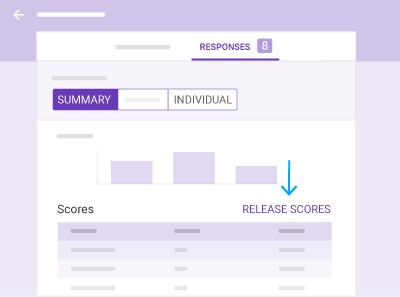
- Under Responses, click Summary or Individual.
- Click Release Score(s).
- Check the boxes next to who you want to email.
- Click Send Emails and Release.
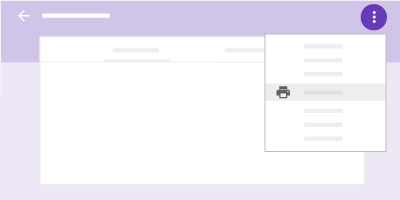
Print a quiz
It’s easy to print questions or responses in a quiz.
Print questions or responses
- At the top of the quiz, click Questions or Responses.
- (Responses only) Click Summary or Individual.
- At top, click More more_vert > Print.
- For questions and individual responses, choose your settings, then click Print.
- For a summary of responses, from your browser, click File > Print.